
Views: 0 Author: Site Editor Publish Time: 2025-09-08 Origin: Site

Begin your trailer wiring harness installation by gathering the right tools and disconnecting the battery to prevent electrical hazards. You can complete this process safely with basic skills and attention to detail. Using a quality wiring harness from Wuxi Everwin Vehicle Parts Co., Ltd improves reliability and simplifies setup. Pay close attention to these common safety issues:
Incorrect grounding causes flickering or non-working lights.
Poor wire protection leads to short circuits.
Incorrect wiring connections create confusion and safety risks.
Follow each step carefully for dependable results.
Gather essential tools like screwdrivers, wire strippers, and a multimeter before starting your installation.
Always disconnect the vehicle's battery to prevent electrical shocks and short circuits during installation.
Use high-quality wiring harnesses, like those from Wuxi Everwin, for better reliability and easier installation.
Follow proper grounding techniques to ensure all trailer lights function correctly and prevent flickering.
Route wires carefully to avoid damage from moving parts and heat sources, using protective tubing where necessary.
Test all trailer lights before towing to ensure safety and compliance with road laws.
Inspect all connections for corrosion and tightness to avoid future electrical issues.
Review local laws regarding trailer wiring to ensure your installation meets safety standards.
Before you start working on your trailer wiring, you need to gather the right materials. Using high-quality parts and tools ensures your installation will last and perform safely, whether you drive a toyota tundra or another vehicle.
You should prepare the following tools before beginning your trailer wiring project:
Wire strippers and crimping tool
Electrical tape or heat shrink tubing
Zip ties for securing wires
A test light or multimeter for checking connections
Basic hand tools, such as pliers and wrenches
These tools help you strip, connect, and secure wires with precision. A test light or multimeter allows you to verify that your trailer wiring works correctly before you finish the job.
Choosing the right parts is essential for a reliable trailer wiring installation. For the best results, select a wiring harness designed for your vehicle, such as the Wuxi Everwin Vehicle Parts Co., Ltd wiring harness. This product stands out for its durability, IP67 waterproof rating, and ease of installation. It features automotive-grade connectors, heavy-gauge copper wire, and abrasion-resistant insulation. These qualities make it ideal for demanding conditions, including off-road use with a toyota tundra.
Here is a checklist of recommended parts:
Wuxi Everwin Vehicle Parts Co., Ltd wiring harness (custom-fit for your vehicle, including toyota tundra)
4-pin plug for standard trailer connections
16 gauge wire for brake lights, turn signals, and tail lights
High-quality automotive wires with cross-linked polyethylene jackets
Durable connectors (SAE, Deutsch, or vehicle-specific)
Towing wiring harness kit (especially for toyota tundra models)
Inline fuse holders and switches (optional for added protection)
Tip: Always use automotive-grade wires and connectors. House wires or generic connectors may fail under vibration or exposure to moisture.
Safety should always come first when installing trailer wiring. You need to protect yourself from sharp edges, electrical shorts, and debris. Make sure you have:
Protective gloves to prevent cuts and scrapes
Safety glasses to shield your eyes from debris
Work clothes that cover your arms and legs
Wearing the right safety gear helps you avoid injuries and ensures you can focus on installing your trailer wiring harness correctly.
Note: Proper insulation and secure connections are critical for both safety and the long-term reliability of your trailer wiring. The Everwin wiring harness uses splice-free terminals and robust insulation to help you achieve this.
By gathering these materials and using a quality wiring harness, you set yourself up for a smooth installation process. Whether you are upgrading your toyota tundra or another vehicle, these steps will help you achieve safe and dependable trailer wiring.
Begin by choosing a safe, flat location to work on your vehicle. You should park away from traffic and distractions. Set the parking brake to prevent any movement. If you work in a garage, open the doors for ventilation. Place wheel chocks behind the tires for extra stability. This step keeps you safe and prevents accidents while you install the trailer wiring harness.
Tip: Always inspect your vehicle for any visible damage before starting. Look for frayed wires, corrosion, or loose connectors. Replace any damaged parts to avoid future problems.
You must disconnect the battery before handling any electrical components. This step protects you from electrical shocks and prevents short circuits. Follow these steps for a safe battery disconnection:
Shut off the engine and turn off all electrical accessories.
Locate the battery under the hood.
Use a wrench to loosen the nut on the negative terminal first. Remove the cable and set it aside.
If needed, remove the positive cable next.
Lift the battery out carefully, keeping it level to avoid spilling acid.
Wearing safety gloves and glasses adds another layer of protection. Manufacturers recommend disconnecting the battery before starting any wiring work. This precaution helps you avoid accidental shorts and keeps your vehicle’s electrical system safe.
After securing your vehicle and disconnecting the battery, you need to find the wiring access points. Most vehicles have wiring entry points near the rear bumper or inside the trunk. Check your owner’s manual or a wiring diagram for your specific model. Look for rubber grommets or factory harness connectors. These areas allow you to route the new wiring harness without drilling or damaging the vehicle.
Inspect the access points for signs of wear or corrosion. Make sure connectors are pressed together firmly. Avoid pinching wires when routing the harness. If you notice any damaged wires or connectors, replace them before proceeding. Conduct a quick light function test to confirm everything works as expected.
Note: Studying your vehicle’s wiring diagram helps you understand power sources and grounding points. This step makes the installation smoother and reduces mistakes.
By following these steps, you create a safe and organized workspace. You also protect your vehicle’s electrical system and ensure a reliable trailer wiring harness installation. Taking time to prepare pays off with fewer problems and a smoother process.
You need to remove interior panels to reach the wiring behind your vehicle’s dashboard or trunk. This process requires patience and the right tools. Follow these steps to safely remove panels and avoid damaging clips or connectors:
Disconnect the negative battery cable to prevent electrical damage.
Open the glove box and unhook any clips or fasteners.
Locate and remove all screws on the lower dashboard panel.
Use a screwdriver to disconnect the faceplate for the audio system.
Find and loosen screws and latches on the top section of the dash.
Detach all wiring and wrap exposed ends in electrical tape before fully removing the panel.
Tip: Keep all screws and clips in a small container. This helps you avoid losing hardware during reassembly.
After you remove the panels, you will see several wires bundled together. Identifying the correct wires for your trailer wiring harness is crucial. Most vehicles use standard color codes for wiring. Refer to the table below to match each wire to its function:
| Wire Color | Function |
|---|---|
| Brown | Taillights and Running Lights |
| Yellow | Left Turn Signal and Left Brake Light |
| White | Ground Wire |
| Blue | Electric Trailer Brakes |
| Green | Right Turn Signal and Right Brake Light |
| Orange | 12v Battery Power or Auxiliary Power |
| Grey | Reverse Lights |
You should double-check your vehicle’s wiring diagram to confirm these colors. Some manufacturers use unique color codes. Always test wires with a multimeter or test light before making connections.
Note: The Wuxi Everwin Vehicle Parts Co., Ltd wiring harness features intuitive labeling and consistent color-coding. This simplifies the identification process and reduces installation errors.
Before connecting your new wiring harness, you must clean all electrical contact points. Dirty or corroded connectors can cause poor performance or intermittent trailer lights. Use these recommended cleaning methods:
Mix baking soda with water to clean battery terminals and connectors.
Apply specialty contact cleaners for stubborn corrosion. These cleaners evaporate quickly and do not conduct electricity.
Use alcohol or acetone to remove dirt and grease. Spray onto the area and wipe with a clean cloth.
For harnesses, ultrasonic cleaning or a solution like Simple Green with a small brush works well.
After cleaning, apply dielectric grease to protect against future corrosion.
To clean a corroded connector, disconnect the power source and unplug the connector. Apply the baking soda solution, scrub with a stiff brush, rinse with distilled water, and dry thoroughly.
Holts Electrical Contact Cleaner also removes grease, oil, and dirt without damaging sensitive components. It dries quickly and leaves no residue, making it ideal for preparing electrical parts for new connections.
⚡ Pro Tip: Always ensure connection points are completely dry before attaching your new harness. This step prevents shorts and ensures a reliable electrical connection.
You need to match the wire colors between your vehicle and the trailer wiring harness before you begin the installation. Most North American and European vehicles use standard color codes for trailer wiring. These codes help you identify each wire’s function and prevent mistakes during trailer wiring installation.
Here are the most common color codes you will encounter:
White: Ground (chassis negative)
Brown: Taillights or running lights
Yellow: Left brake and turn signal
Green: Right brake and turn signal
You should always check your vehicle’s wiring diagram to confirm these colors. The Wuxi Everwin Vehicle Parts Co., Ltd wiring harness features intuitive labeling and consistent color-coding, making it easier for you to match each wire correctly. This step is essential for a smooth install trailer wiring harness process.
Tip: If you are unsure about a wire’s function, use a test light or multimeter to verify the signal before connecting.
After you match the wire colors, you need to connect the wiring harness to your vehicle’s wiring. You have several reliable methods to choose from, each with its own advantages.
T-connectors allow you to attach wiring harness quickly and securely. These connectors fit between your vehicle’s existing wiring and the trailer wiring harness, creating a solid connection without cutting or splicing wires. You simply plug the T-connector into the factory harness, then connect the trailer wiring harness to the T-connector.
T-connectors are ideal for most DIY installations. They reduce installation time and minimize the risk of wiring errors.
Soldering provides a strong and permanent connection for trailer wiring. You strip the wire ends, twist them together, and apply solder. After the solder cools, you cover the joint with heat shrink tubing to protect it from moisture and vibration.
| Method | Advantages | Disadvantages |
|---|---|---|
| Soldering | Economical, requires minimal tools, reliable for general-duty applications | Generates heat, sensitive to corrosion and vibration, time-consuming, potential for cold solder joints |
| Crimping | Fast, creates air-tight seals, highly durable when done correctly | Requires specific tooling, must be performed correctly for reliability |
You should choose the method that best fits your skill level and the demands of your trailer wiring installation. The Everwin wiring harness supports both T-connectors and soldering, giving you flexibility during installation of trailer wiring harness.
Note: Always ensure connectors match before planning to tow. Firmly press connectors together to maintain a stable electrical connection.
A solid ground connection is critical for proper trailer light function. You must connect the white ground wire from the trailer wiring harness directly to the vehicle or trailer frame. This step prevents flickering or dim lights, ensures safe brake operation, and reduces the risk of shorts or electrical fires.
Prevents flickering or dim lights
Ensures safe brake operation
Reduces risk of shorts and electrical fires
Enhances overall electrical efficiency
You should ground the light harness to the trailer frame as close to the lights as possible. Use through bolts and a star washer to create a secure connection. On the tow vehicle, ground the connector directly to the frame instead of relying on the hitch coupler.
Pro Tip: Clean the grounding location thoroughly before attaching the wire. Use a wire brush to remove paint, rust, or debris for the best electrical contact.
The Everwin wiring harness includes splice-free terminals and robust insulation, which help you achieve a reliable ground connection. Intuitive labeling and color-coding make it easy to identify the ground wire and complete this step with confidence.
By following these steps, you ensure your trailer wiring functions safely and reliably. You now know how to install trailer wiring harness with professional results.
You need to route your trailer wiring with care to prevent damage and ensure long-term reliability. Start by planning the path before you begin attaching anything. Choose a route that keeps wires away from moving parts, sharp edges, and hot surfaces like exhaust pipes. Secure the wiring along the vehicle frame or underbody, following the factory harness path when possible.
Use split loom tubing to bundle and protect wires from abrasion.
Add rubber grommets wherever the wiring passes through metal panels.
Leave a small coil of excess wire near each connection point. This extra length makes future repairs easier.
Run a dedicated ground wire to each light instead of relying on the trailer tongue for grounding.
Select submersible-rated LED lights to prevent moisture damage.
Seal all connections with heat shrink tubing and silicone paste to block out water and corrosion.
Tip: Plan your wiring route before you start. This step helps you avoid common mistakes and keeps your trailer wiring safe from damage.
After you route the trailer wiring, you must secure it firmly to prevent sagging or chafing. Use high-quality clips or ties designed for automotive use. The table below shows two effective options:
| Clip Type | Description | Dimensions (inches) |
|---|---|---|
| Wire Frame Clip | Secures one or more wires on the frame or panel surface | Height: 1-1/2, Width: 1/2, Capacity: 3/8 |
| Metal Loom Clamp | Attaches to the frame with self-tapping screws; two sizes available | 1/2 inch and 1/4 inch sizes |
Space the clips or ties every 12 to 18 inches along the wiring path. Avoid using household zip ties, which can become brittle and break. Always check that the wiring does not hang down or rub against any moving parts.
Note: Properly secured trailer wiring prevents common failures such as damaged wiring, weak connections, and overloaded harnesses.
Protecting your trailer wiring from heat and abrasion extends its lifespan and prevents electrical problems. Use split loom tubing or flexible conduit to shield wires in exposed areas. Add extra protection where the wiring crosses metal edges or passes near the exhaust system.
Apply liquid electrical tape over soldered joints for a waterproof seal.
Use adhesive-lined heat shrink tubing on all connections.
Install rubber grommets in holes or slots to prevent chafing.
Inspect the wiring regularly for signs of wear or heat damage.
Common causes of trailer wiring harness failure include damaged wiring inside frame rails, poor connections, overloaded harnesses, and weak grounds. You can prevent these issues by following best practices for securing and protecting your wiring.
⚡ Pro Tip: Regular inspection and maintenance keep your trailer wiring in top condition and help you avoid unexpected failures on the road.

You have completed the wiring and secured all connections. Now, you need to reconnect the vehicle battery. Attach the positive cable first, then the negative cable. Tighten the terminals with a wrench. Make sure the battery sits level and secure in its tray. This step restores power to your vehicle and prepares you to test the trailer wiring harness.
Tip: Wear gloves and safety glasses when handling the battery. Double-check that all tools and loose wires are clear of the engine bay before reconnecting.
Testing your trailer lights before towing is essential for safety and compliance. You want to confirm that every function works as intended. Follow these steps for a systematic check:
Plug the trailer wiring harness into your vehicle’s connector.
Use a multimeter or test light to verify voltage at each pin on the trailer plug.
Ask an assistant to activate each light function—brake, turn signals, running lights, and reverse lights—while you observe the trailer lights.
Try a wiggle test by gently moving sections of the wiring while the lights are on. Watch for flickering or loss of function, which can indicate a loose connection.
Inspect all light functions individually. Confirm that each bulb illuminates at the correct time.
Look for physical damage along the wiring, such as cuts or frays.
Note: Everwin wiring harnesses feature clear labeling and consistent color-coding, which makes troubleshooting and testing much easier. Each harness undergoes rigorous reliability testing before leaving the factory.
If you notice any trailer lights not working, you need to troubleshoot the problem. Start by checking all connections for tightness and signs of corrosion. Inspect the wiring for wear, especially near connectors and grounding points. Use a continuity tester to check the wiring from the trailer plug to each light.
Examine the plug and socket on both the trailer and vehicle sides for dirt, rust, or damage.
Clean any corrosion and ensure the connector is firmly inserted.
Test the vehicle’s electrical system for blown fuses or faulty wiring.
Inspect the trailer’s ground connection. A poor ground is the most common cause of lighting issues.
Ensure that the ground wire (usually the white wire) from the trailer’s wiring plug is securely connected to the trailer frame. A poor ground connection is the most common cause of trailer light issues.
You may encounter problems such as poor connection between the towing vehicle and trailer wiring, blown fuses, or faulty bulbs. Isolate the issue by testing the vehicle and trailer lights independently. Verify wire connections and replace any damaged components.
By following these steps, you ensure your trailer wiring harness functions reliably. You protect yourself and others on the road by confirming that all trailer lights operate correctly before towing.
Before you finish your trailer wiring harness installation, take time to inspect every connection. Look for signs of corrosion, worn-out connectors, or faulty bulbs. Exposure to moisture and road salt often leads to corrosion, which can weaken your electrical connections. Worn connectors may cause unreliable signals, while faulty bulbs result in non-working lights.
Common issues you might find during your final inspection include:
Corrosion on terminals or connectors
Connectors that feel loose or do not snap together securely
Burned-out bulbs in the trailer lights
You should also check for these problems:
One or more trailer light functions do not work, such as brake lights or turn signals.
All trailer lights fail to operate.
Lights worked at first but stopped after some use.
Activating one turn signal causes both sides to flash.
Turning on headlights causes trailer lights to stop working.
Trailer lights remain on even when the ignition is off.
The harness works until you connect the trailer.
Reverse lights on the trailer do not function.
Tip: If you notice dim or flickering lights, you likely have a weak connection or poor ground. Always double-check these areas for a secure fit.
Loose or disconnected wires can cause many trailer wiring problems. You may see dim or flickering lights, or some functions may not work at all. These symptoms often point to a weak electrical connection or a broken wire in the harness.
Check for these common causes:
Wires that are not connected or have pulled loose from terminals
Connectors that do not make a strong connection
Blown fuses in the vehicle’s fuse box
Brake wire not attached properly
Insufficient ground connection
You should gently tug on each wire to ensure it is secure. If you find any loose wires, reconnect them and use electrical tape or heat shrink tubing for added protection. Make sure all grounds are clean and tight. A solid ground is essential for reliable trailer light operation.
You must follow local and regional laws for trailer wiring to stay safe and legal on the road. Regulations often specify wiring colors, functions, and minimum wire sizes. These rules help ensure your trailer lights work correctly and other drivers can see your signals.
Here is a table showing common wiring standards:
| Pin | Signal | Color | Recommended Cross-section (mm²) |
|---|---|---|---|
| 1 | Ground | White | 2.5 |
| 2 | Left Turn Signal | Yellow | 1.5 |
| 3 | Right Turn Signal | Green | 1.5 |
| 4 | Stop Lamps | Red | 1.5 |
| 5 | Tail Lamps (left) | Black | 1.5 |
| 6 | Tail Lamps (right) | Brown | 1.5 |
| 7A | Reversing Lamps | Pink | 1.5 |
| 7B | Rear Fog Lamps | Blue | 1.5 |
| 12 | +24V Permanent | Orange | 2.5 |
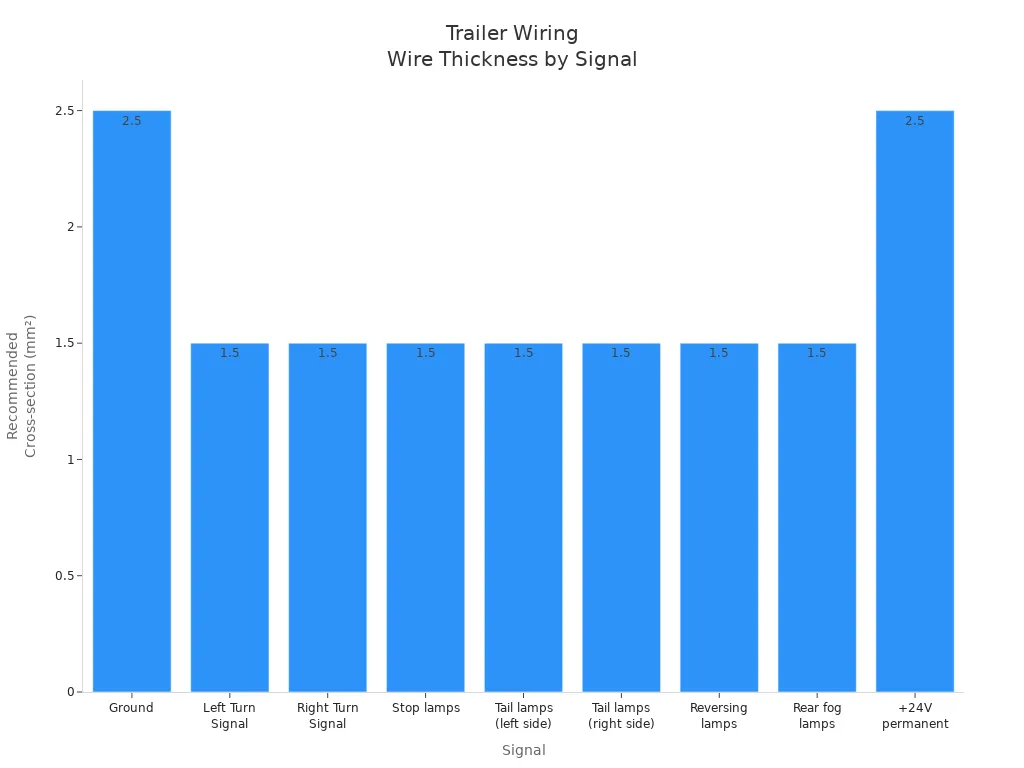
Note: Trailer lights must connect to your vehicle’s lighting system. Most regions require specific wiring colors and functions for safety and compliance. Always check your local laws before towing.
By following these final checks and tips, you help ensure your trailer wiring harness works reliably and meets all legal requirements. Careful inspection and attention to detail keep you and others safe on the road.
You have learned the essential steps for installing a trailer wiring harness. Using a high-quality harness, such as the Everwin Wiring Harness, offers several advantages:
Durable materials withstand harsh conditions.
Weatherproof design protects wires from moisture and dust.
Plug-and-play connectors simplify installation.
Secure connections prevent signal loss.
Versatile compatibility supports different trailer types.
Proper installation ensures your trailer’s lights and brakes work correctly. Follow each step, test your connections, and inspect your work. If you need more guidance, consult your vehicle’s manual or seek help from a professional. Careful installation keeps your towing experience safe and reliable.
You need screwdrivers, wire strippers, a crimping tool, electrical tape or heat shrink tubing, zip ties, and a test light or multimeter. These tools help you strip, connect, and secure wires with accuracy.
Yes, you can install a trailer wiring harness if you follow instructions and use the right tools. Most DIYers complete the job in a few hours. Always disconnect the battery before starting.
Check your vehicle’s make, model, and year. The Wuxi Everwin Vehicle Parts Co., Ltd wiring harness offers custom-fit options. Review the product specifications or contact the manufacturer for compatibility.
Inspect all connections for tightness and corrosion. Test each wire with a multimeter. Confirm the ground wire attaches securely to bare metal. Replace any damaged connectors or blown fuses.
Use split loom tubing and heat shrink tubing on all connections. The Everwin wiring harness features IP67-rated connectors that block water, dust, and oil. Always route wires away from exposed areas.
A solid ground ensures all trailer lights work correctly. Poor grounding causes flickering or non-working lights. Always attach the white ground wire to clean, bare metal on the frame.
Yes, always test every light function before towing. Plug in the trailer, activate each light, and check for proper operation. This step keeps you safe and compliant with road laws.


